
CyberComply User Guide
Beginner Guide for CMMC Compliance Management
For first-time users, project managers, control owners, control operators, administrators, and auditors
Application reviewed: CyberComply GRC demonstration environment
Prepared September 2026
Purpose: This manual explains how to set up a CMMC project, define scope, assign responsibility, document implementation, manage evidence, collaborate with auditors, track remediation, and generate reports. It is written for users who have never used CyberComply.
Important: The screenshots use demonstration data. Names, progress percentages, dates, users, and control counts in your own tenant will differ. Access to menus and actions can also vary by role.
Document Guide
| Item | Details |
|---|---|
| Product | CyberComply GRC |
| Primary framework shown | CMMC version 2 with Level 1 and Level 2 controls and assessment objectives |
| Intended audience | New users, tenant administrators, project managers, InfoSec personnel, control owners, operators, and auditors |
| Coverage | Login, tenants, projects, scoping, controls, policies, evidence, matrix, remediation, reports, findings, integrations, questionnaires, administration, and troubleshooting |
| Operating principle | Complete scope first, assign responsibility, document implementation, attach evidence, conduct internal review, address findings, and then prepare assessment reports |
How to Use This Manual
-
Read Sections 1 through 6 before creating or configuring a project.
-
Use Sections 7 through 13 during implementation and evidence collection.
-
Use Sections 14 through 18 for reporting, audit support, vendor questionnaires, and administration.
-
Use the quick reference and glossary at the end when you need the meaning of a status, role, or field.
-
Do not mark a control complete solely because text was entered. Confirm that the implementation is operating and that the evidence is current, relevant, and reviewable.
Contents
| Section | Topic |
|---|---|
| 1 | System Overview |
| 2 | Signing In and Using OTP |
| 3 | Navigation and Interface Basics |
| 4 | Tenants and Users |
| 5 | Projects and Framework Selection |
| 6 | Project Summary and Readiness Metrics |
| 7 | System Scoping |
| 8 | Controls and Assessment Objectives |
| 9 | Completing a Control Workspace |
| 10 | Policies |
| 11 | Evidence Management |
| 12 | Responsibility Matrix |
| 13 | Remediation and POA&M |
| 14 | Reports and Exports |
| 15 | Findings |
| 16 | Integrations |
| 17 | Questionnaires |
| 18 | Project and Administrative Settings |
| 19 | Recommended End-to-End Workflow |
| 20 | Common Tasks and Troubleshooting |
| 21 | Status Reference and Glossary |
1 System Overview
CyberComply organizes compliance work into tenants, projects, frameworks, controls, assessment objectives, policies, evidence, assigned responsibilities, remediation tasks, and reports.
Core Structure
| Layer | What It Represents | Typical User Action |
|---|---|---|
| Instance | The overall CyberComply environment. | Instance administrators manage users, settings, frameworks, and logs. |
| Tenant | A company, client, or separate organizational workspace. | Select the tenant before opening its projects, policies, users, and evidence. |
| Project | A compliance effort tied to a framework, such as CMMC version 2. | Track readiness, assign people, document controls, and generate reports. |
| Control | A CMMC practice or requirement. | Review the requirement and its assessment objectives. |
| Subcontrol | An assessment objective used to determine whether the control is satisfied. | Add implementation detail, evidence, ownership, progress, and review status. |
| Policy | A reusable governance document that can be associated with projects and controls. | Create or select a policy, assign an owner and reviewer, and keep it current. |
| Evidence | An artifact that supports one or more assessment objectives. | Upload or create evidence, classify it, map it, and manage its lifecycle. |
| Remediation | A corrective action or POA&M task linked to a control or other source. | Assign a POC, risk, effort, due date, status, and required resources. |
What CyberComply Does Not Replace
-
Management decisions about the actual system boundary and CUI environment.
-
Technical implementation of security controls in endpoints, networks, cloud services, applications, and business processes.
-
Qualified legal, contractual, or assessment advice.
-
Independent validation by a C3PAO when certification is required.
-
The organization's responsibility to make accurate representations in SPRS and other government systems.
2 Signing In and Using OTP
CyberComply uses email and password authentication followed by a one-time password when OTP is enabled for the account.
Application Address
Open https://demo.cybercomply.app/login for the demonstration environment. Production customers should use the application address provided by their administrator. The billing and account console is a separate system and may use different credentials.
Sign In Procedure
1. Open the CyberComply GRC login page.
2. Enter the email address associated with your CyberComply user account.
3. Enter the password and select Log in to CyberComply GRC.
4. When the OTP screen appears, retrieve the current code from the configured authenticator, email, or other approved method.
5. Enter the OTP before it expires and submit it.
6. Confirm that the Projects page or your assigned landing page appears.
Security: Never share a password or OTP by email, chat, ticket, or screenshot. An administrator may reset access, but should not ask for the current password or OTP.
If Sign In Fails
| Symptom | Likely Cause | What to Do |
|---|---|---|
| Invalid email or password | Wrong credentials or the credentials belong to the separate billing console. | Confirm the application URL and account email. Use Forgot password if appropriate. |
| OTP rejected | Expired code, incorrect time on the authenticator device, or wrong account selected. | Wait for a new code, verify device time, and retry once. |
| No tenant appears | The user is not assigned to a tenant. | Ask a tenant or instance administrator to add the user. |
| Menus are missing | Role or project membership does not authorize the feature. | Ask the project manager or administrator to verify the assigned role. |
3 Navigation and Interface Basics
CyberComply uses a left navigation rail, a tenant selector in the top bar, and project-specific tabs across the top of an open project.
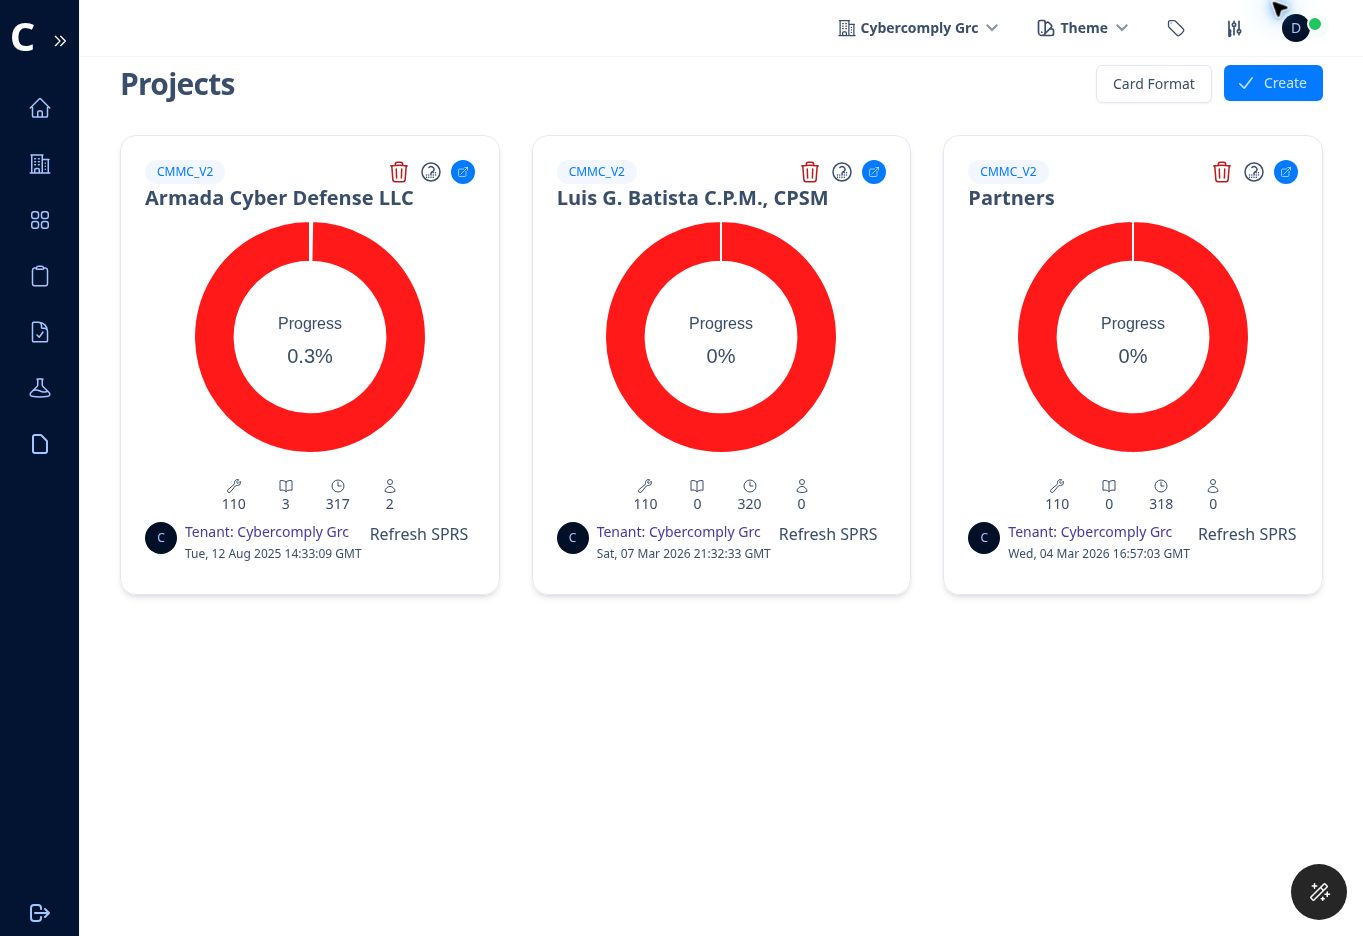
Figure 1. Projects page showing multiple CMMC projects within the selected tenant.
Left Navigation
| Menu | Purpose |
|---|---|
| Home | Returns to the main application landing area. |
| Tenants | Manages tenant workspaces and opens tenant user administration. |
| Projects | Lists compliance projects for the selected tenant. |
| Policies | Opens the reusable tenant policy library. |
| Evidence | Opens the tenant-wide evidence library. |
| Questionnaire | Creates and manages vendor or third-party questionnaires. |
| More | Provides Frameworks, Tags, Labels, Tenant Users, Instance Users, Settings, Logs, and Help when authorized. |
| Logout | Ends the current session. |
Top Bar
-
Tenant selector: changes the active tenant. A reload prompt may appear after selection. Select Reload Now to apply the change.
-
Theme: changes the display theme when this option is available.
-
Profile indicator: identifies the signed-in account and may show presence or session state.
-
Breadcrumbs: show your location and provide links back to Projects or the open project.
Avoid wrong-tenant work: Always check the tenant name in the top bar before creating a project, adding evidence, or inviting a user.
4 Tenants and Users
A tenant separates one company or client workspace from another. Projects, users, evidence, policies, and administrative settings are associated with the active tenant.
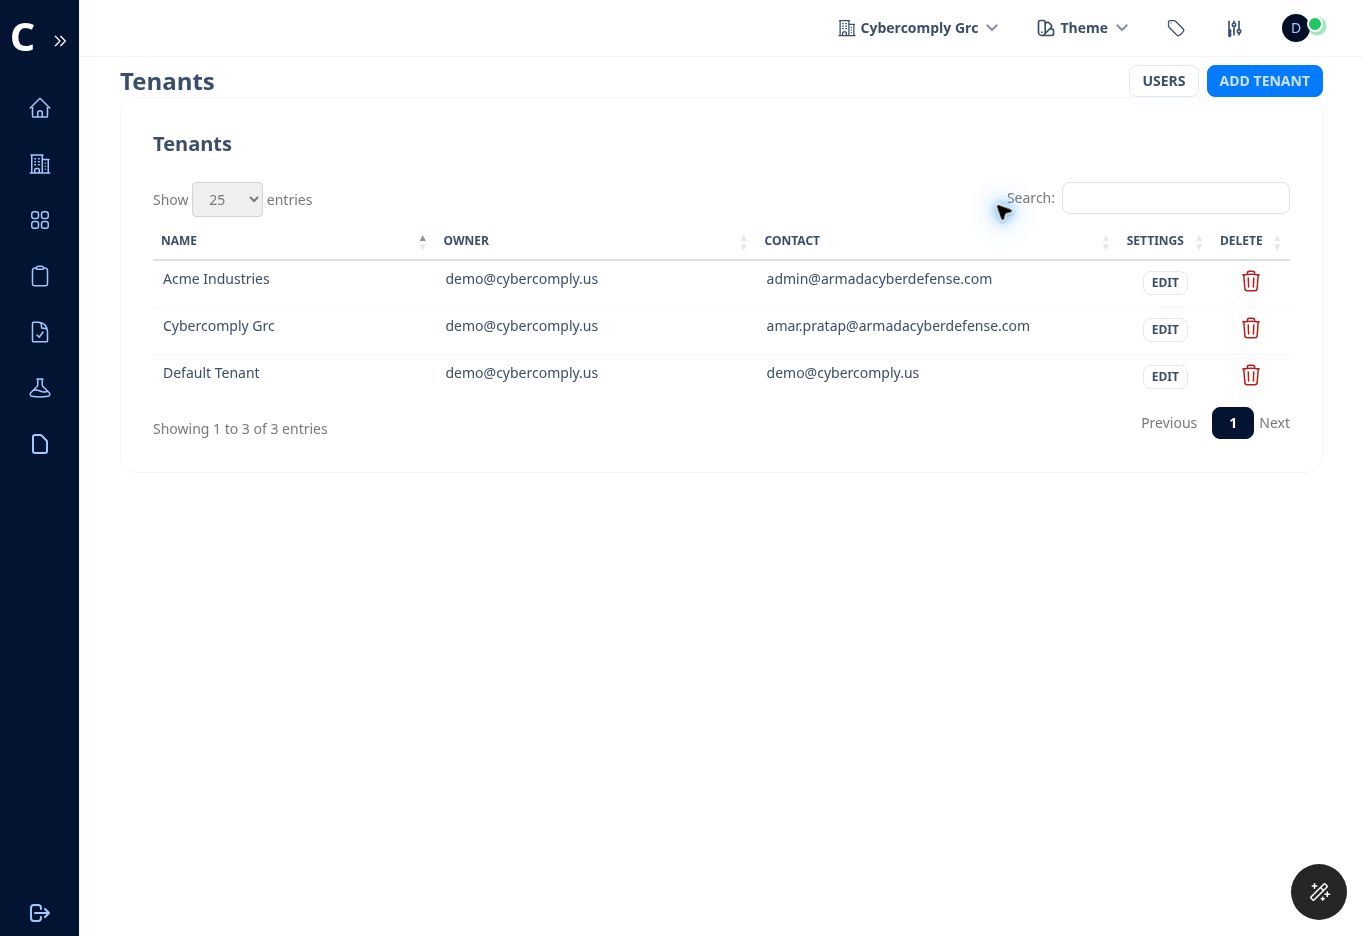
Figure 2. Tenant administration page with owner, contact, edit, and delete actions.
Switch Tenants
1. Open the tenant selector in the top bar.
2. Choose the tenant you need.
3. Select Reload Now when prompted.
4. Verify the tenant name before continuing.
Add or Edit a Tenant
1. Open Tenants from the left navigation.
2. Select Add Tenant to create a workspace, or Edit beside an existing tenant.
3. Enter or update the tenant name and contact email.
4. Save the change.
5. For an existing tenant, use Reload Frameworks or Reload Policies only when the administrator understands the impact on the tenant configuration.
Deletion warning: Deleting a tenant can remove its projects, configuration, progress, and related data. Confirm the exact tenant before using the delete action.
Tenant Users
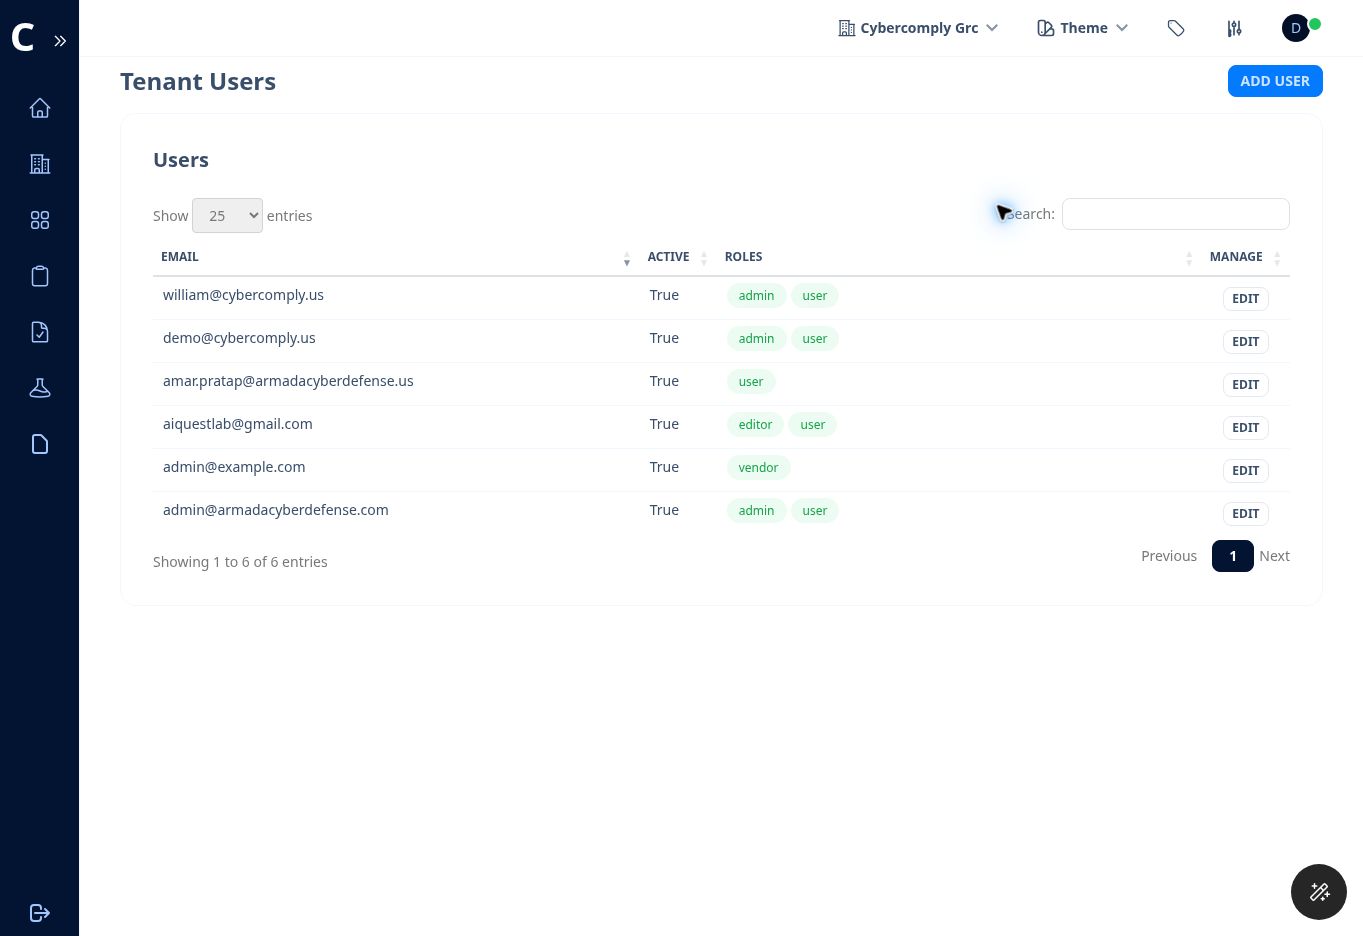
Figure 3. Tenant user list showing active status, assigned roles, and edit controls.
1. From Tenants, select Users, or open More and then Tenant Users.
2. Select Add User.
3. Enter the user email, confirm the tenant, and select the appropriate role or roles.
4. Save the new user.
5. Use Edit to change active status or assigned roles when responsibilities change.
Role design: Tenant roles, project membership, control ownership, control operation, and auditor assignment are separate concepts. Giving someone a tenant role does not automatically assign every control or add the person as a project auditor.
5 Projects and Framework Selection
A project is the working record for a specific compliance effort. The demonstration tenant shows projects using the cmmc_v2 framework.
Project Card Information
| Card Element | Meaning |
|---|---|
| Framework label | The framework loaded into the project, such as cmmc_v2. |
| Progress ring | Overall project completion percentage. |
| Controls | Number of framework controls in the project. |
| Policies | Number of policies currently associated with the project. |
| InfoSec queue | Assessment objectives waiting for the information security team. |
| Auditor queue | Assessment objectives waiting for auditor review. |
| Refresh SPRS | Recalculates the displayed SPRS score from the current assessment data. |
| Open icon | Opens the project workspace. |
Create a New Project
1. Select Projects from the left navigation.
2. Select Create.
3. Choose Create New.
4. Enter the Project Name and Description.
5. Select the framework. The application notes that additional controls can be added later.
6. Confirm the tenant.
7. Select Save and wait for the project card to appear.
Import a Project Archive
1. Open the Create dialog and choose Import Project.
2. Choose the previously exported project archive in ZIP format.
3. Select Import Project.
4. Review the imported owner, tags, policies, controls, and progress before continuing. The current user becomes the project owner, and policies are imported when the base policy already exists for the tenant.
Framework choice: Choose the correct framework before substantive work begins. Changing the framework later can affect control mapping, policies, evidence, scoring, and reports.
6 Project Summary and Readiness Metrics
The Summary page is the project command center. It combines readiness metrics, review queues, SPRS score, quick filters, and project details.
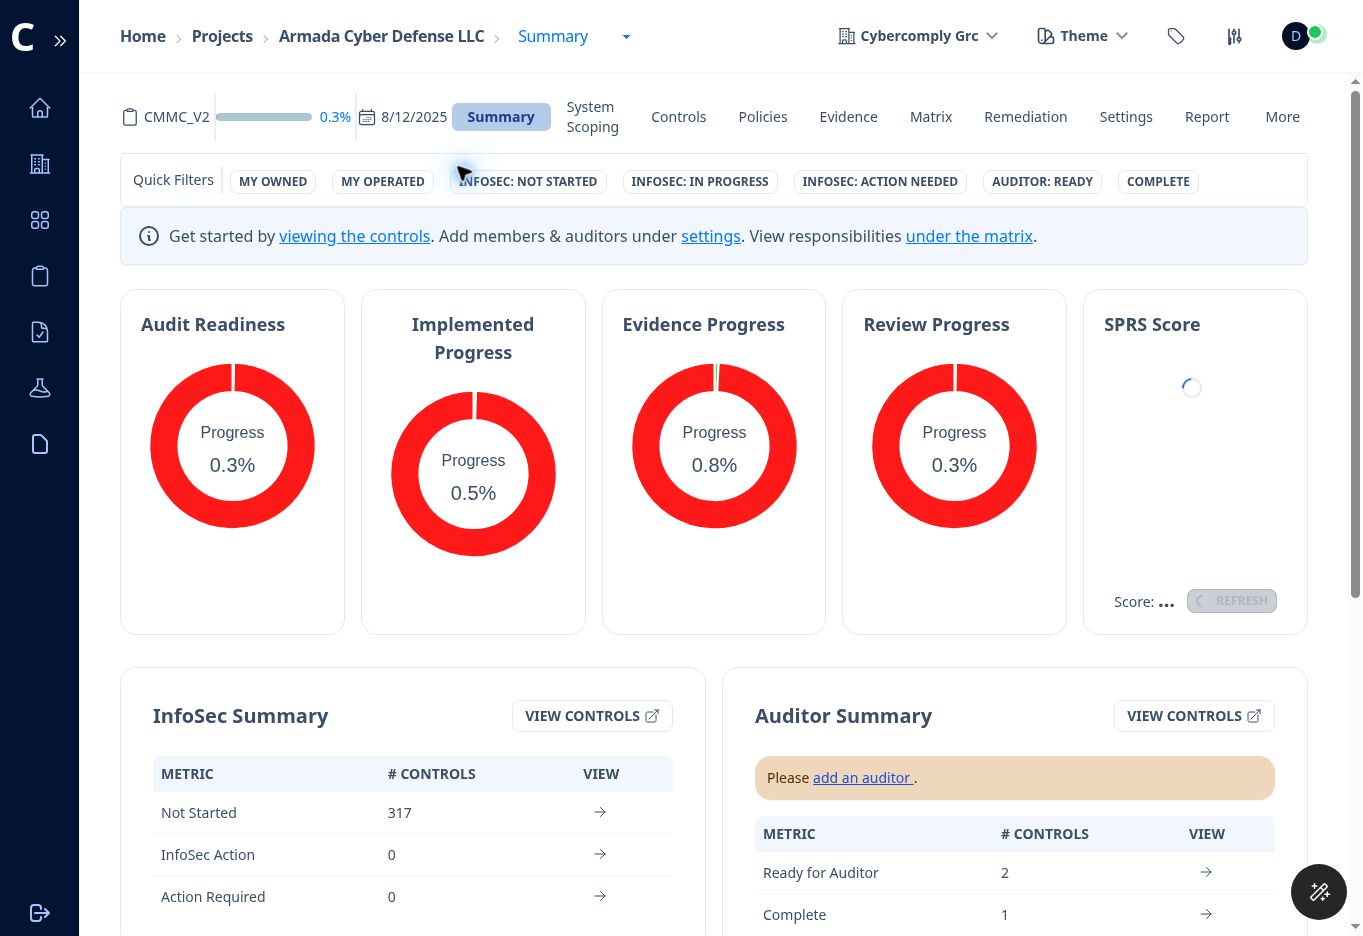
Figure 4. Project Summary with readiness, implementation, evidence, review, and SPRS metrics.
Summary Metrics
| Metric | What It Shows | How to Use It |
|---|---|---|
| Audit Readiness | Overall completion across the project. | Use as a high-level indicator, not as proof of certification readiness. |
| Implemented Progress | Progress of controls marked as implemented. | Identify control families where technical or procedural work remains. |
| Evidence Progress | Progress of evidence attached to control objectives. | Locate implemented controls that still lack sufficient support. |
| Review Progress | Progress through the InfoSec and auditor review cycle. | Monitor how much work has reached and completed review. |
| SPRS Score | Calculated score on the displayed range of -203 to 110. | Refresh after material control updates and verify the result before external submission. |
Quick Filters
-
My Owned shows objectives where the signed-in user is the control owner.
-
My Operated shows objectives where the signed-in user is responsible for execution.
-
InfoSec Not Started identifies work that has not entered the review cycle.
-
InfoSec In Progress identifies work being prepared by the InfoSec team.
-
InfoSec Action Needed identifies work returned for correction or additional information.
-
Auditor Ready identifies objectives queued for auditor review.
-
Complete identifies objectives that have completed the configured review workflow.
7 System Scoping
Complete System Scoping before treating the control assessment as mature. The scoping readiness indicator counts completed checks across nine sections.
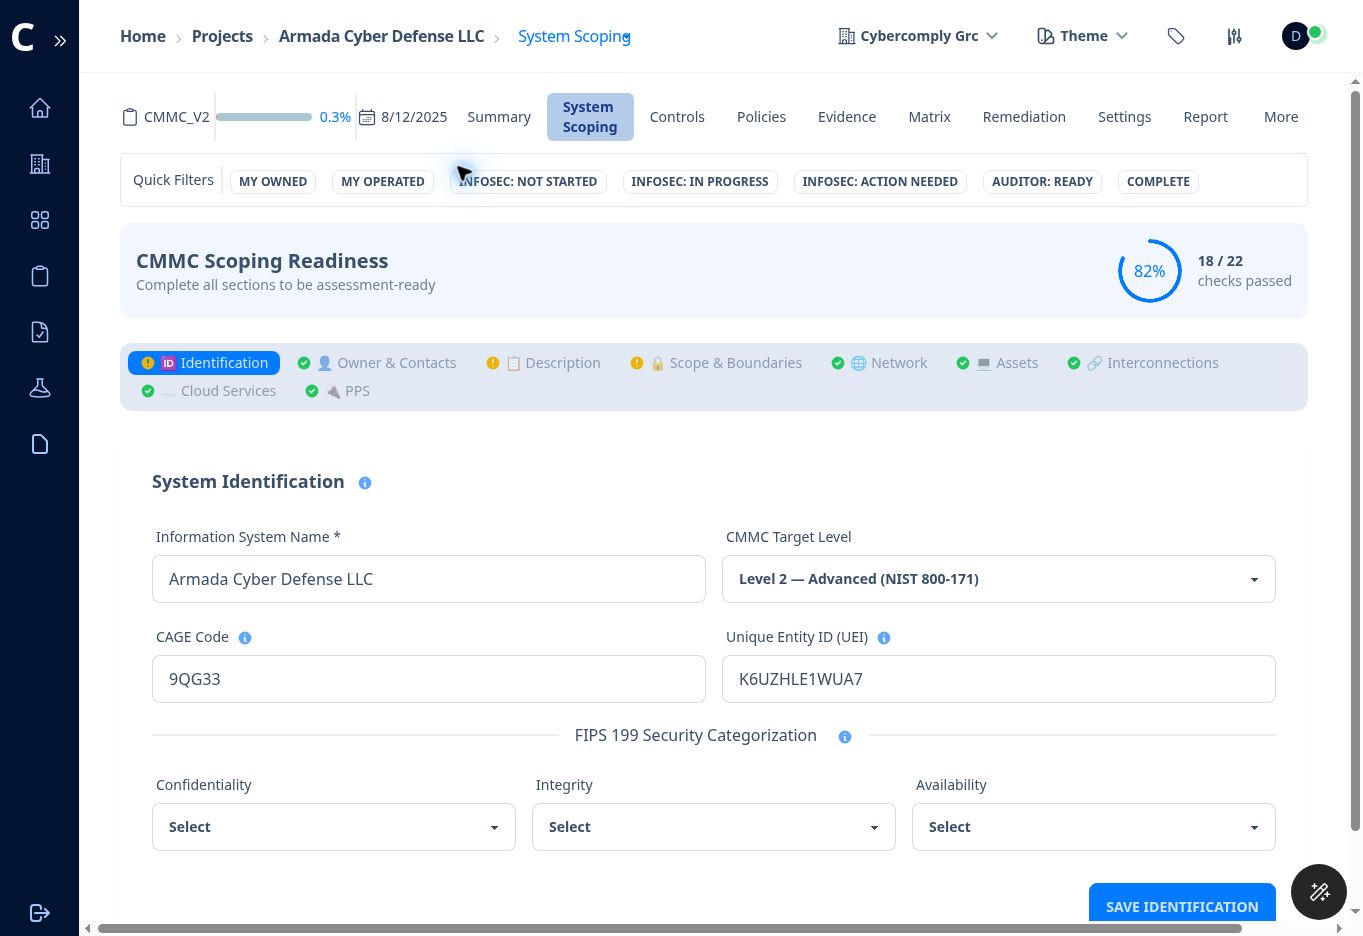
Figure 5. CMMC Scoping Readiness with section status and system identification fields.
Scoping Sections
| Section | Information to Enter | Completion Check |
|---|---|---|
| Identification | System name, CMMC target level, CAGE code, UEI, and FIPS 199 confidentiality, integrity, and availability categorizations. | Required identity fields are complete and match organizational records. |
| Owner and Contacts | Information system owner, address, and designated contacts. | Every role has a named and current contact. |
| Description | Business purpose, environment type, environment description, authorization boundary, and physical locations. | A new reader can understand what the system does and where it operates. |
| Scope and Boundaries | CUI data types, logical and physical boundary description, system boundary diagram, and data flow diagram. | CUI entry, storage, processing, transmission, protection, and exit points are represented. |
| Network | Network architecture and network diagram. | The diagram reflects current segments, security devices, remote access, and connections. |
| Assets | Asset inventory and CMMC asset category. | Every in-scope and boundary-relevant asset is listed and categorized. |
| Interconnections | External and internal system connections. | Connection purpose, direction, safeguards, and parties are documented. |
| Cloud Services | Cloud service providers used by the scoped environment. | Relevant providers and security responsibilities are identified. |
| PPS | Ports, protocols, and services entries. | Only authorized and necessary network services are documented. |
Recommended Scoping Sequence
1. Identify the contracts, information types, and locations that drive the CMMC requirement.
2. Name the system and select the target level.
3. Document the owner and designated contacts.
4. Write the system description and authorization boundary in plain language.
5. Identify CUI data types and create boundary and data-flow diagrams.
6. Document network architecture, assets, interconnections, cloud services, and ports, protocols, and services.
7. Review the readiness percentage and complete any section marked incomplete.
8. Have system owners and security personnel validate the scope before relying on control results or SPRS scoring.
Asset Categories
| Category | Typical Use in Scoping |
|---|---|
| CUI Asset | Stores, processes, or transmits CUI. |
| Security Protection Asset | Provides security functions or capabilities to the CUI environment. |
| Contractor Risk Managed Asset | Can affect the CUI environment but is managed through documented risk decisions. |
| Specialized Asset | Includes specialized systems subject to applicable CMMC scoping treatment. |
| Out-of-Scope Asset | Does not process, store, transmit, or provide security protection for CUI and is properly separated. |
Scoping caution: Do not mark an asset out of scope merely because it does not directly store CUI. Security protection assets and connected systems can remain relevant to the assessment boundary.
8 Controls and Assessment Objectives
The Controls page can display high-level controls or the detailed subcontrols used as assessment objectives. For CMMC Level 2, the detailed view may include approximately 320 objectives across 110 controls.
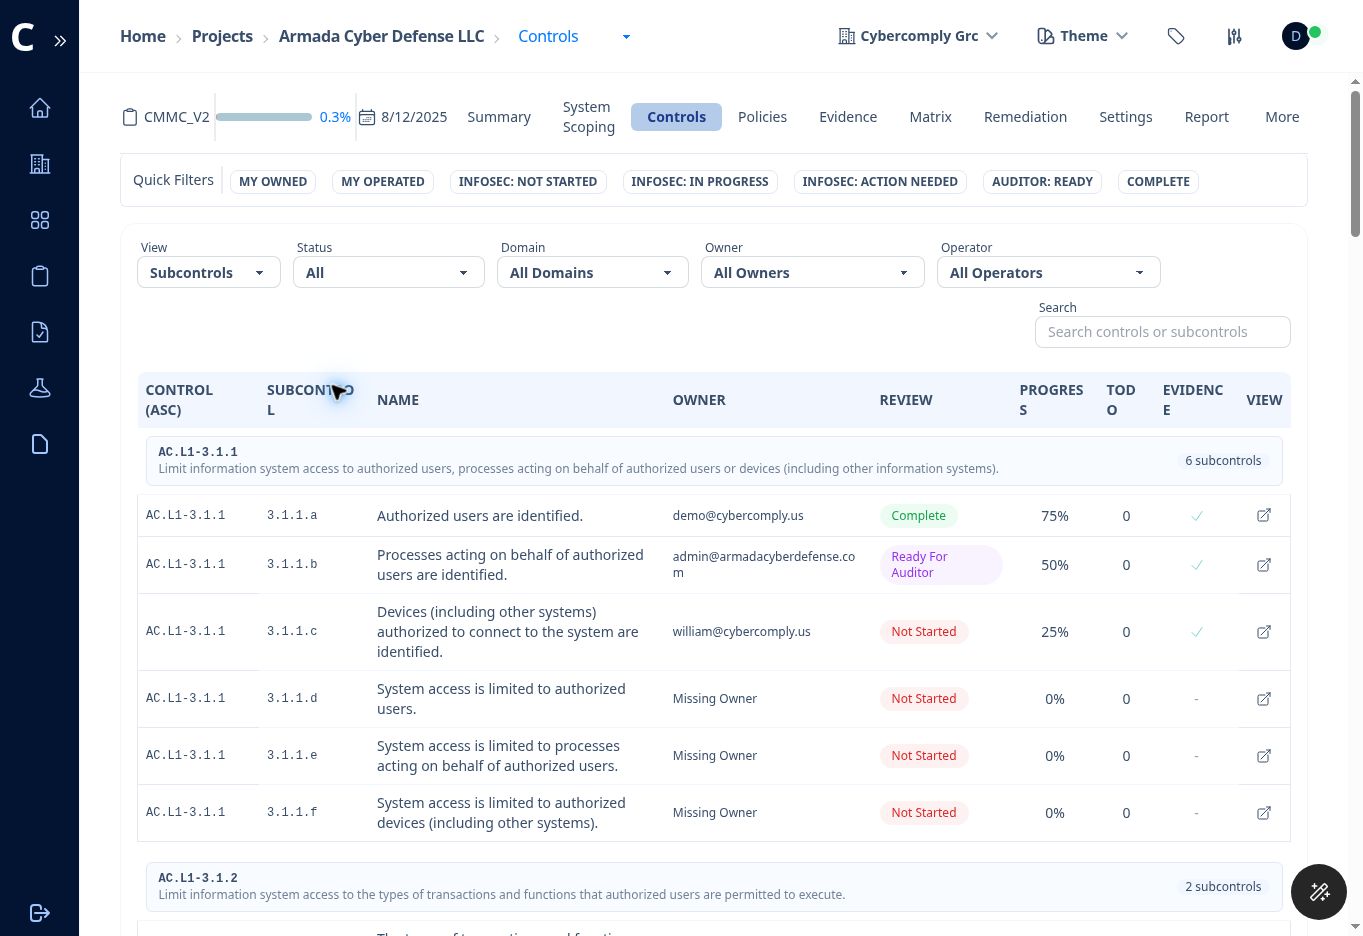
Figure 6. Controls register in Subcontrols view with filters, ownership, review status, progress, evidence, and view actions.
Control Register Filters
| Filter | Available Choices or Purpose |
|---|---|
| View | Controls or Subcontrols. Use Subcontrols for objective-level work. |
| Status | All, Not Started, Missing Evidence, InfoSec Action, Action Required, Ready for Auditor, or Complete. |
| Domain | Filters by CMMC domain, such as Access Control, Audit and Accountability, Risk Assessment, or System and Information Integrity. |
| Owner | Shows objectives assigned to a selected owner or Missing Owner. |
| Operator | Shows objectives assigned to a selected operator or Missing Operator. |
| Search | Searches control identifiers, subcontrol identifiers, or names. |
Understand the Columns
-
Control identifies the CMMC practice, such as AC.L1-3.1.1.
-
Subcontrol identifies an assessment objective, such as 3.1.1.a.
-
Name states the condition the assessor will examine.
-
Owner identifies the accountable person.
-
Review shows the current workflow status.
-
Progress shows the implementation percentage selected in the workspace.
-
Todo shows open work items associated with the objective.
-
Evidence indicates whether supporting evidence is attached.
-
View opens the detailed workspace.
Initial Assignment Pass
1. Filter Owner to Missing Owner and assign an accountable owner to every applicable objective.
2. Filter Operator to Missing Operator and assign the person who will perform or maintain the control activity.
3. Review objectives marked Not Applicable and record a defensible scoping basis.
4. Use Domain filters to distribute work by security discipline.
5. Use My Owned and My Operated from the Summary page for individual work queues.
9 Completing a Control Workspace
The control workspace is where the team documents how an assessment objective is satisfied, assigns responsibility, links evidence, resolves feedback, and prepares the objective for auditor review.
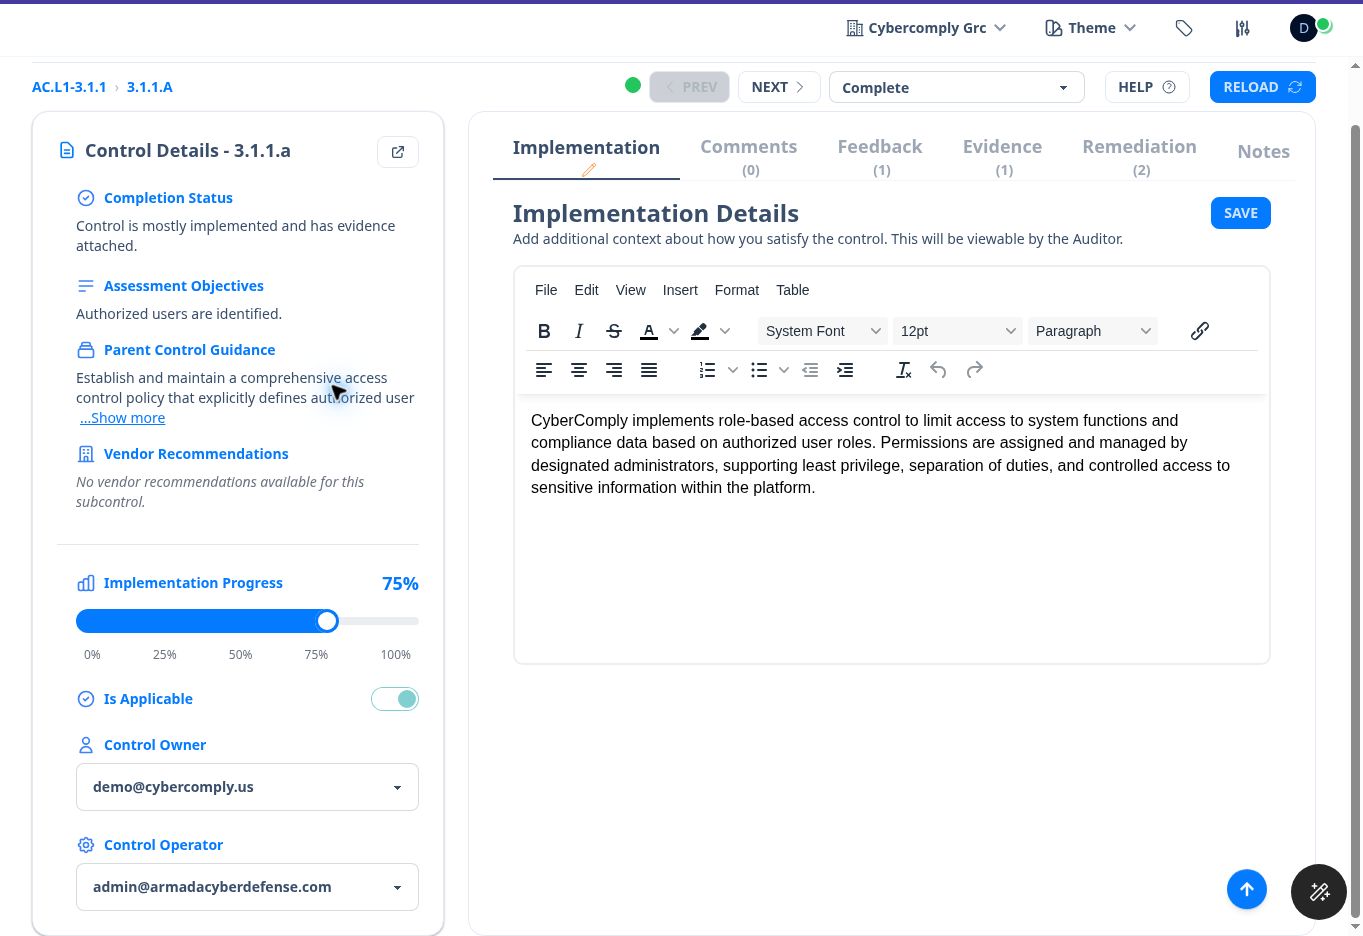
Figure 7. Control workspace showing guidance, progress, applicability, assignments, status, and implementation editor.
Control Header and Left Panel
| Element | Use |
|---|---|
| Prev and Next | Move through adjacent assessment objectives without returning to the register. |
| Status dropdown | Advances the objective through the configured review workflow. |
| Help | Displays assistance for the current workspace. |
| Reload | Refreshes the page data. |
| Completion Status | Summarizes the current implementation and evidence condition. |
| Assessment Objectives | States the specific condition to be satisfied. |
| Parent Control Guidance | Provides broader implementation guidance. |
| Vendor Recommendations | Displays vendor-specific recommendations when available. |
| Implementation Progress | Records the selected implementation percentage. |
| Is Applicable | Identifies whether the objective applies to the scoped environment. |
| Control Owner | Person accountable for the objective. |
| Control Operator | Person responsible for executing or maintaining the activity. |
Recommended Objective Workflow
1. Read the assessment objective and expand the parent guidance when needed.
2. Confirm that the objective applies to the documented system scope.
3. Assign the owner and operator.
4. Describe the actual implementation in the Implementation tab. Name the technology, process, frequency, responsible role, records produced, and exceptions when relevant.
5. Set Implementation Progress to reflect the actual operating state.
6. Attach or create evidence that directly supports the objective.
7. Resolve internal comments and auditor feedback.
8. Create remediation tasks for gaps that cannot be corrected during the review.
9. Use Notes for internal information that should not be visible to the auditor.
10. Advance the review status only when the required work and evidence are ready.
Workspace Tabs
| Tab | Purpose | Visibility or Use |
|---|---|---|
| Implementation | Rich-text description of how the organization satisfies the objective. | Visible to the auditor. |
| Comments | Conversation between the InfoSec team and auditor. | Subject to project auditor settings. |
| Feedback | Auditor action items or questions for the InfoSec team. | Team and auditor should mark completion as work is resolved. |
| Evidence | Attach existing evidence or create new evidence. | Use artifacts that are current, relevant, and readable. |
| Remediation | Track corrective tasks linked to the objective. | Use for assigned gaps, dates, risks, and status. |
| Notes | Internal notes about the objective. | Not viewable by the auditor or reviewer. |
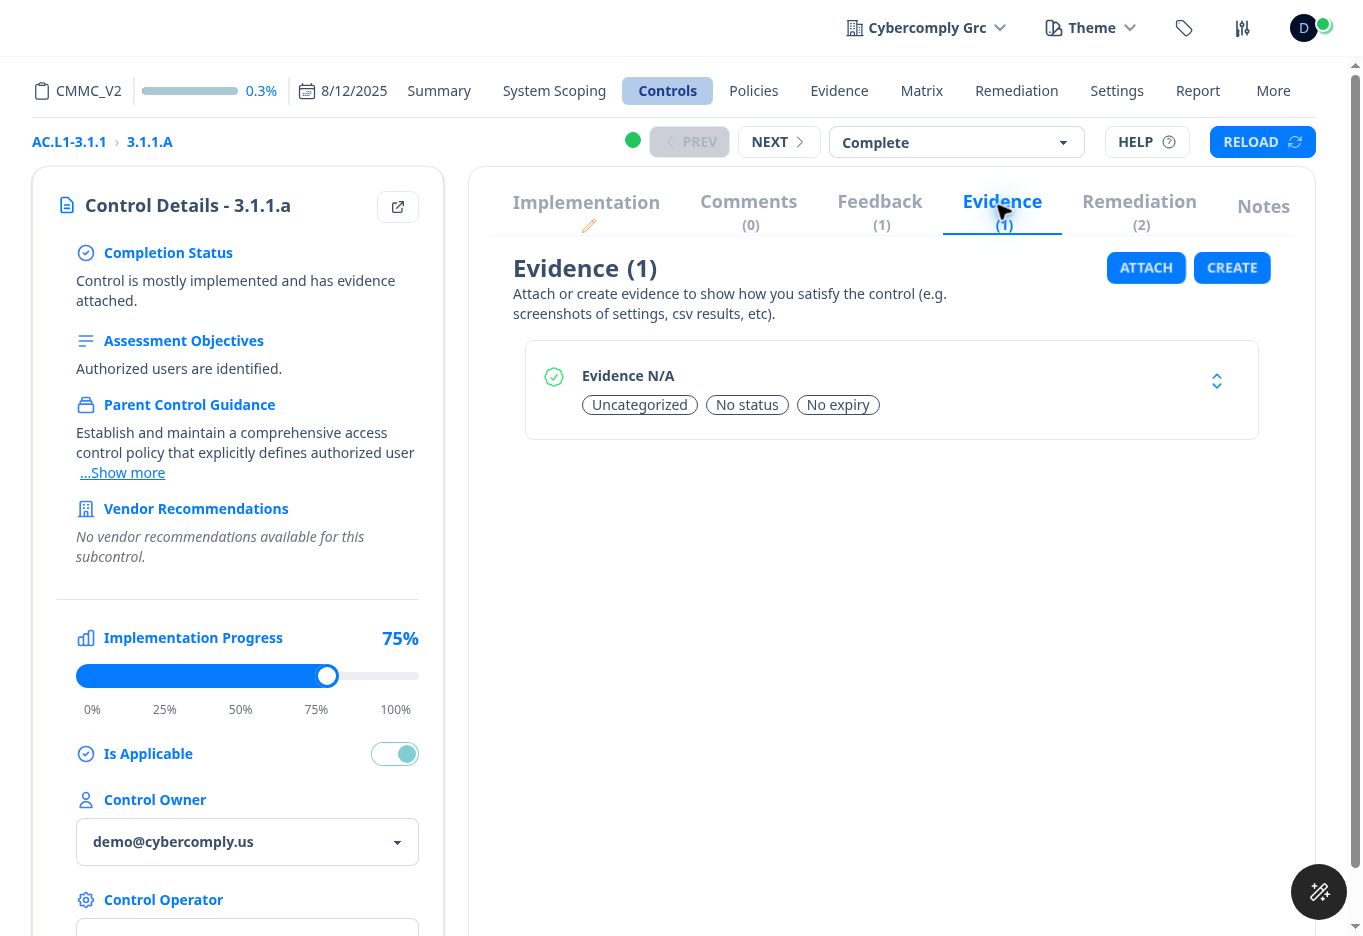
Figure 8. Evidence tab within a control workspace, with Attach and Create options.
Writing Strong Implementation Details
-
State what is implemented, not what the organization intends to implement.
-
Identify systems, applications, device groups, locations, or processes involved.
-
Identify who performs the activity and how often it occurs.
-
Explain enforcement, monitoring, and exception handling where relevant.
-
Point to the specific evidence that demonstrates operation.
-
Avoid generic statements such as "we comply" or copying the requirement without explaining the implementation.
10 Policies
Policies can be created once in the tenant library and then associated with projects and controls. A project policy list tracks ownership and review responsibility.
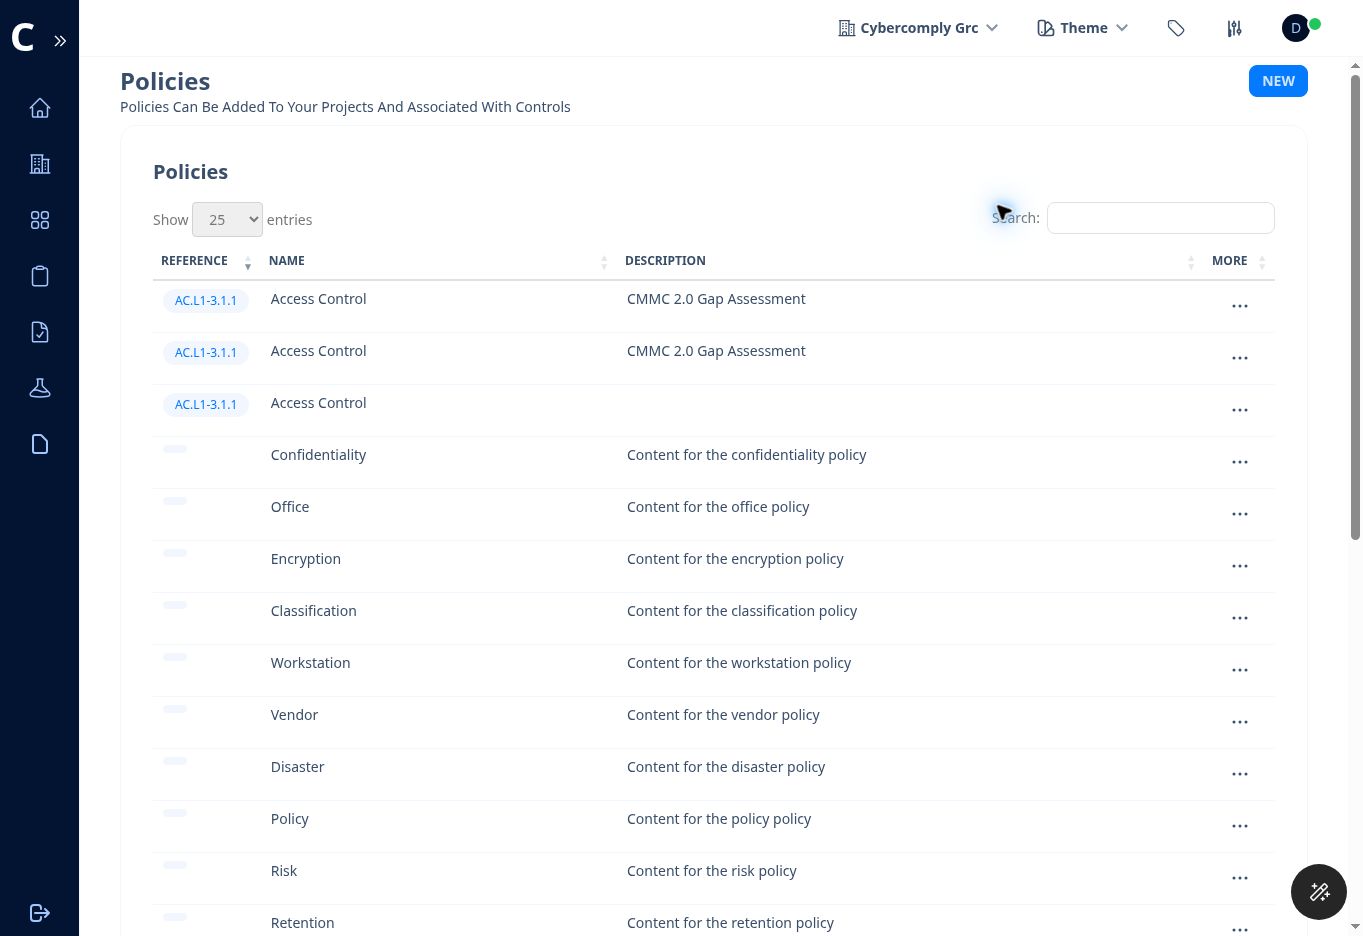
Figure 9. Tenant policy library with reference codes, names, descriptions, and additional actions.
Create a Policy in the Library
1. Open Policies from the left navigation.
2. Select New.
3. Enter the policy Name, Description, and Reference Code when applicable.
4. Save the policy.
5. Use the More action for the policy to manage or associate it as permitted by your role.
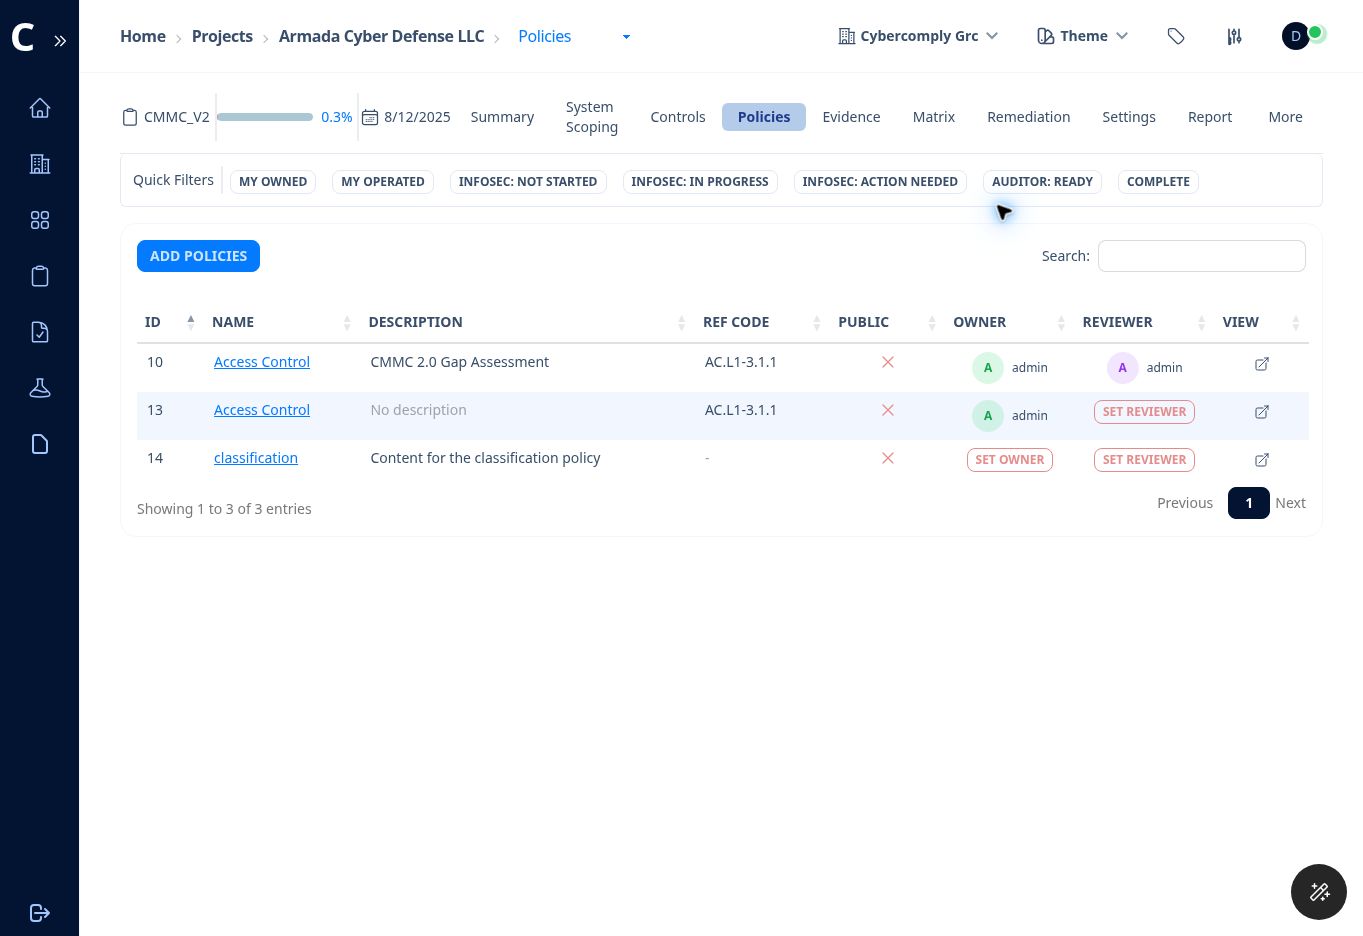
Figure 10. Policies associated with a project, including owner, reviewer, and view actions.
Add Policies to a Project
1. Open the project and select Policies.
2. Select Add Policies.
3. Choose a policy from the tenant library and select the project.
4. Save the association.
5. Assign a policy owner and reviewer when those fields are not already populated.
6. Use View to review the policy content and confirm that it matches actual practice.
Good practice: A policy title and control reference are not sufficient by themselves. Maintain approval, version, effective date, assigned ownership, review cadence, and evidence that the policy is implemented.
11 Evidence Management
Evidence can be created from a control workspace or managed through the project and tenant evidence libraries. One evidence item can support multiple assessment objectives when the mapping is accurate.
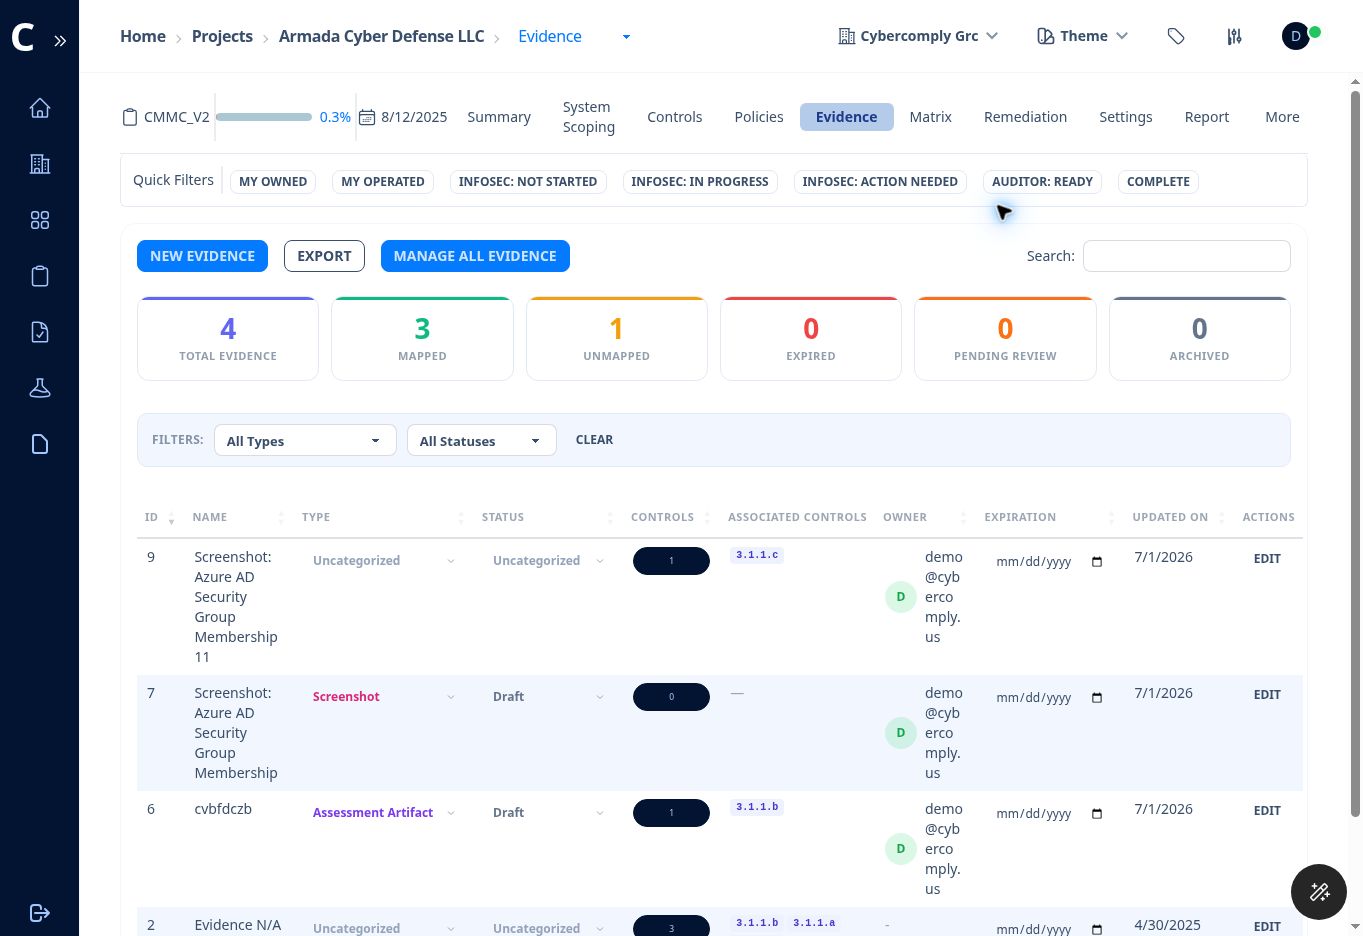
Figure 11. Project evidence inventory with mapping, lifecycle status, owner, expiration, and update information.
Evidence Dashboard Measures
-
Total Evidence counts all evidence visible in the current scope.
-
Mapped counts evidence associated with one or more controls.
-
Unmapped identifies evidence not yet associated with a control.
-
Expired identifies evidence beyond its expiration date.
-
Pending Review identifies evidence waiting for approval or review.
-
Archived identifies evidence retained but no longer active.
Create New Evidence
1. Select New Evidence on the project Evidence page, or New in the tenant Evidence library.
2. Enter a descriptive Name that identifies the artifact and period covered.
3. Add a Description explaining what the artifact demonstrates.
4. Enter the Collected On date.
5. Select an Evidence Type.
6. Select the current Status.
7. Enter an Expiration Date when the artifact must be refreshed.
8. Add evidence content or choose one or more files to upload.
9. Save the evidence.
10. Map it to the relevant assessment objective or objectives.
Evidence Types
| Type | Example |
|---|---|
| Policy | Approved access control or incident response policy. |
| Procedure | Account provisioning or media sanitization procedure. |
| Screenshot | Configuration page showing MFA, logging, or group membership. |
| Configuration Export | Exported device, firewall, identity, or cloud configuration. |
| System Report | System-generated compliance or security report. |
| Log File | Relevant audit, authentication, alert, or administrative log. |
| Training Record | Completion report for required security training. |
| Meeting Minutes | Minutes showing a required review or governance decision. |
| Network Diagram | Current diagram of the scoped environment. |
| Asset Inventory | Current list of systems and devices with scoping categories. |
| Scan Report | Vulnerability, configuration, or technical assessment results. |
| Certificate | Certificate or attestation supporting a requirement. |
| Assessment Artifact | Artifact created specifically for an assessment objective. |
| Other | Evidence that does not fit another defined category. |
Evidence Statuses
| Status | Use |
|---|---|
| Uncategorized | The lifecycle status has not yet been assigned. |
| Draft | The artifact is being prepared or checked. |
| Pending Review | The artifact is ready for reviewer action. |
| Approved | The artifact has passed the organization's review. |
| Rejected | The artifact is insufficient, incorrect, or requires replacement. |
| Expired | The artifact is no longer current for its intended use. |
| Archived | The artifact is retained for history but not active evidence. |
Evidence quality: Use evidence that is objective, dated, attributable, readable, and tied to the specific assessment objective. Remove unnecessary sensitive information before upload, but do not alter the substance needed for verification.
12 Responsibility Matrix
The Responsibility Matrix summarizes control ownership and operation. It also exposes missing assignments that can block completion and review.
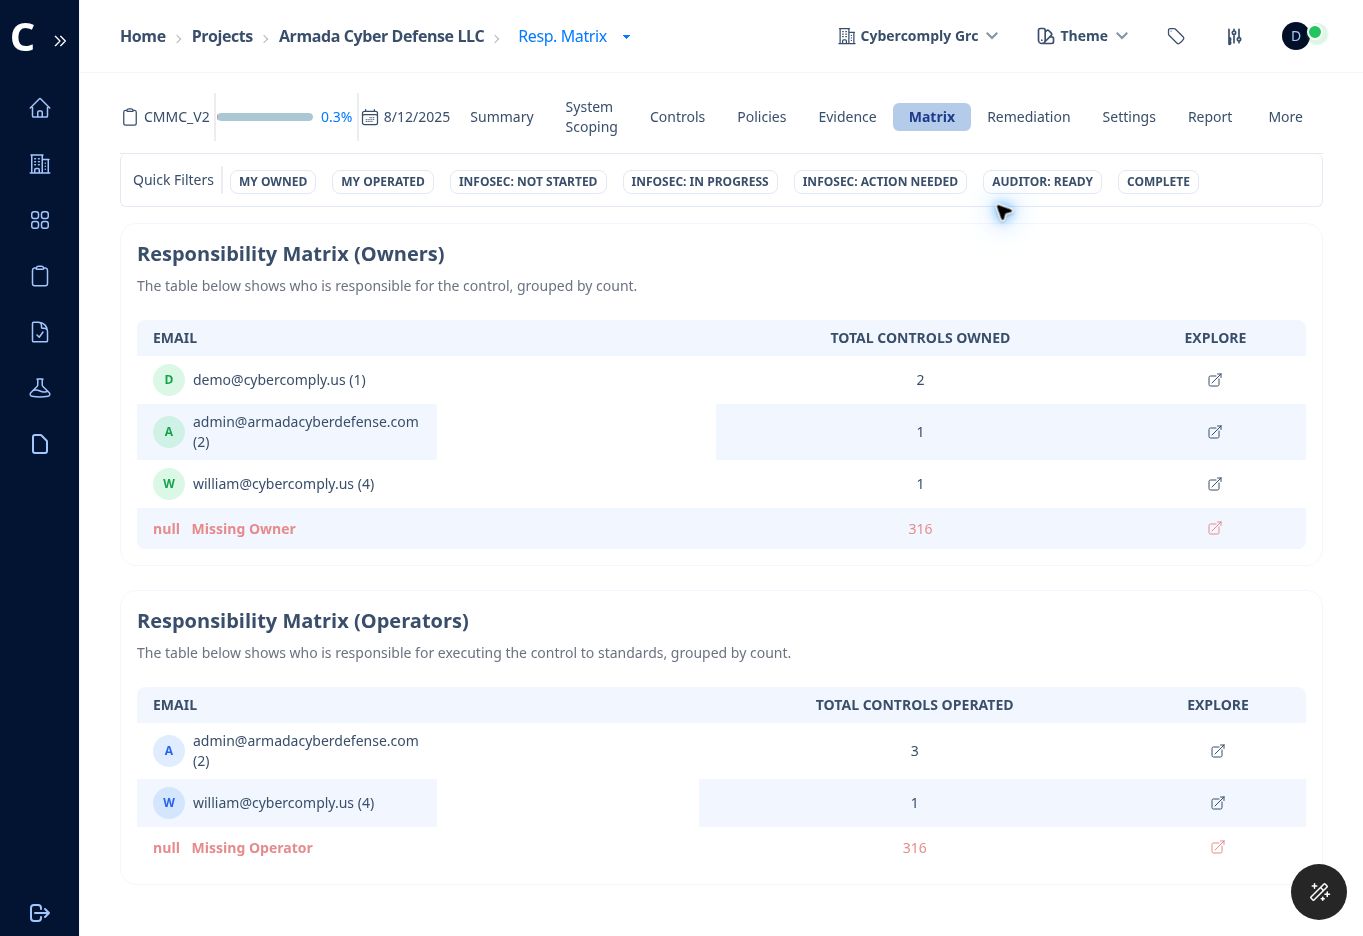
Figure 12. Responsibility Matrix for control owners and operators.
Owner and Operator Distinction
| Role | Primary Responsibility |
|---|---|
| Control Owner | Accountable for ensuring the objective is implemented, documented, supported, and maintained. |
| Control Operator | Performs or maintains the technical or procedural activity that satisfies the objective. |
| Project Manager | Coordinates the project, assignments, schedule, completeness, and report readiness. |
| Auditor | Reviews implementation and evidence and records feedback or completion according to project permissions. |
Use the Matrix
1. Open Matrix from the project tabs.
2. Review the Owners table and select the Explore icon to view a person's assigned objectives.
3. Review the Operators table in the same manner.
4. Prioritize Missing Owner and Missing Operator rows.
5. Return to the Controls page and assign responsibility at the objective level.
6. Revisit the matrix during weekly project reviews to detect unassigned or overloaded personnel.
13 Remediation and POA&M
The Remediation page centralizes corrective actions. Tasks can be created from a control workspace or directly on the Remediation page and exported to an Excel POA&M.
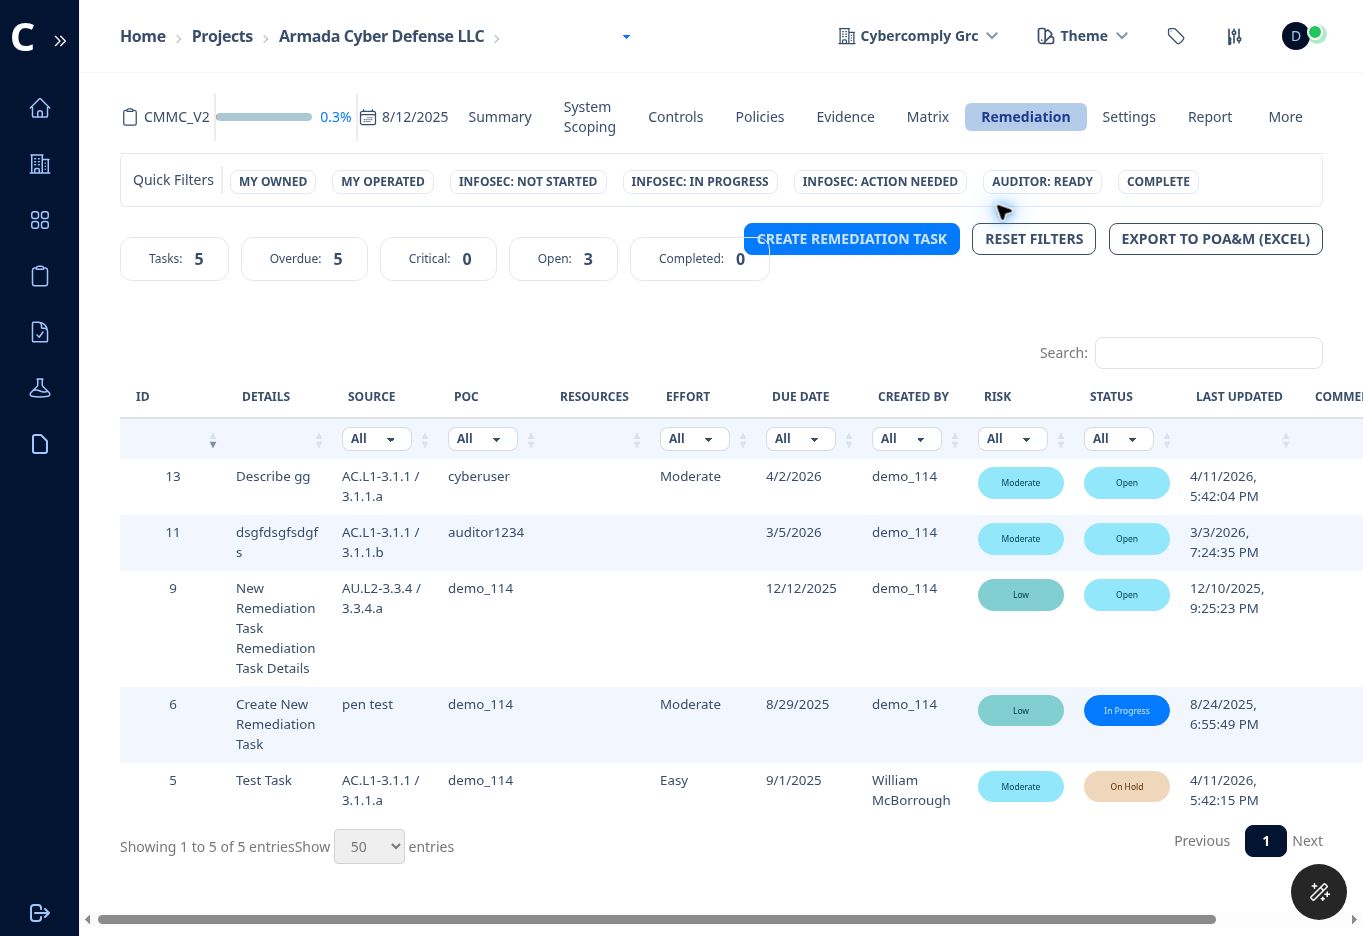
Figure 13. Remediation register with task totals, due-date filters, risk, status, and POA&M export.
Create a Remediation Task
1. Open Remediation and select Create Remediation Task, or use Add Remediation Task from an assessment objective.
2. Enter clear task Details.
3. Enter the Source, such as a control objective, penetration test finding, internal review, or audit observation.
4. Set the Due Date.
5. Assign the Owner or point of contact.
6. Select Risk: Low, Moderate, High, or Critical.
7. Select Level of Effort: Easy, Moderate, or Tough.
8. Describe the Resources Required.
9. Create the task and verify it appears in the remediation register.
Task Statuses
| Status | When to Use |
|---|---|
| Open | The task is accepted but work has not started. |
| In Progress | Corrective work is actively underway. |
| On Hold | Work is paused pending a dependency, decision, budget, or resource. |
| Completed | The assigned corrective work is finished. |
| Under Validation | The implementation is being tested or reviewed for effectiveness. |
| Accepted Risk | Authorized management has accepted the residual risk under the organization's process. |
POA&M Export
1. Review task details, source, POC, resources, effort, due date, risk, status, comments, and last update.
2. Resolve missing owners and unrealistic due dates.
3. Select Export to POA&M (Excel).
4. Open the workbook and verify all required columns and control references before external use.
CMMC caution: Whether a deficiency can remain on a POA&M depends on the governing CMMC and contract rules. Do not assume that every unmet requirement can be deferred.
14 Reports and Exports
The Reports page generates and stores versioned compliance and System Security Plan reports. Available download formats can vary by report version.
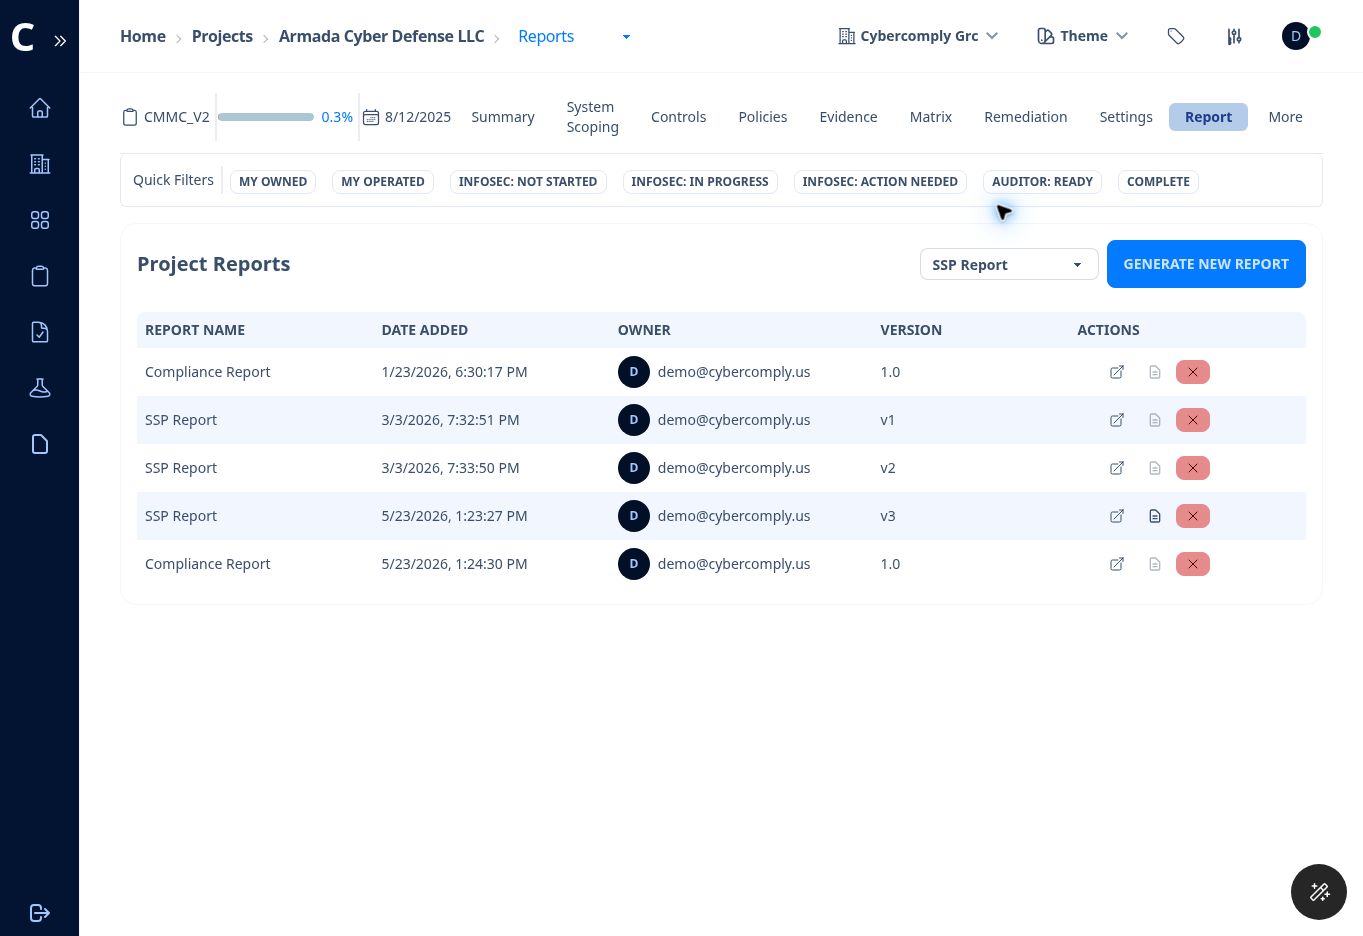
Figure 14. Project Reports page showing report type, version history, and actions.
Generate a Report
1. Open Report from the project tabs.
2. Choose Compliance Report or SSP Report.
3. Select Generate New Report.
4. Wait for the new version to appear in the table.
5. Use View Report to inspect the output before downloading it.
6. Download the PDF. Download Word when a Word version is available.
7. Retain the version that supports the applicable assessment or submission milestone.
Report Readiness Review
-
Confirm system scoping is complete and current.
-
Confirm control owners and operators are assigned.
-
Confirm implementation narratives describe the actual environment.
-
Confirm evidence mappings are complete and expired evidence has been refreshed.
-
Confirm unresolved feedback, findings, and remediation are accurately represented.
-
Confirm the SPRS score has been recalculated after material changes.
-
Review generated reports for missing fields, formatting issues, and unsupported conclusions.
Project Export
Project Settings includes Export Project. The exported snapshot includes controls, subcontrols, and project policies. Store the archive securely because it may contain sensitive compliance information. Use the project import function to restore or transfer a supported archive.
15 Findings
Findings record discrete issues identified during internal review, assessment preparation, technical testing, or auditor activity.
Add a Finding
1. Open More in the project tabs and select Findings.
2. Select Add Finding.
3. Enter the Title and Description.
4. Select Severity: Critical, High, Medium, Low, or Info.
5. Select Status: Open, In Progress, Resolved, or Closed.
6. Enter a specific Recommendation.
7. Save the finding and link related remediation where appropriate.
Finding versus remediation: A finding states the condition and its significance. A remediation task defines the corrective action, owner, resources, due date, risk, effort, and execution status.
16 Integrations
Project Integrations can connect CyberComply with supported external services. The demonstration environment lists Jira, GitHub, Slack, and Custom as integration types.
Add an Integration
1. Open More in the project tabs and select Integrations.
2. Select Add Integration, or select Add on a listed provider card.
3. Choose the Integration Type.
4. Complete the provider-specific connection fields that appear.
5. Use a service account or least-privilege connection authorized by the organization.
6. Test the connection and confirm what information will be synchronized or transmitted.
Authorization: Connecting an external service can transmit project data or create external actions. Confirm authorization, scope, permissions, and data handling before enabling an integration.
17 Questionnaires
Questionnaires provide a form builder for vendor, supplier, or third-party information collection. Questionnaires can be created empty or copied from a template.
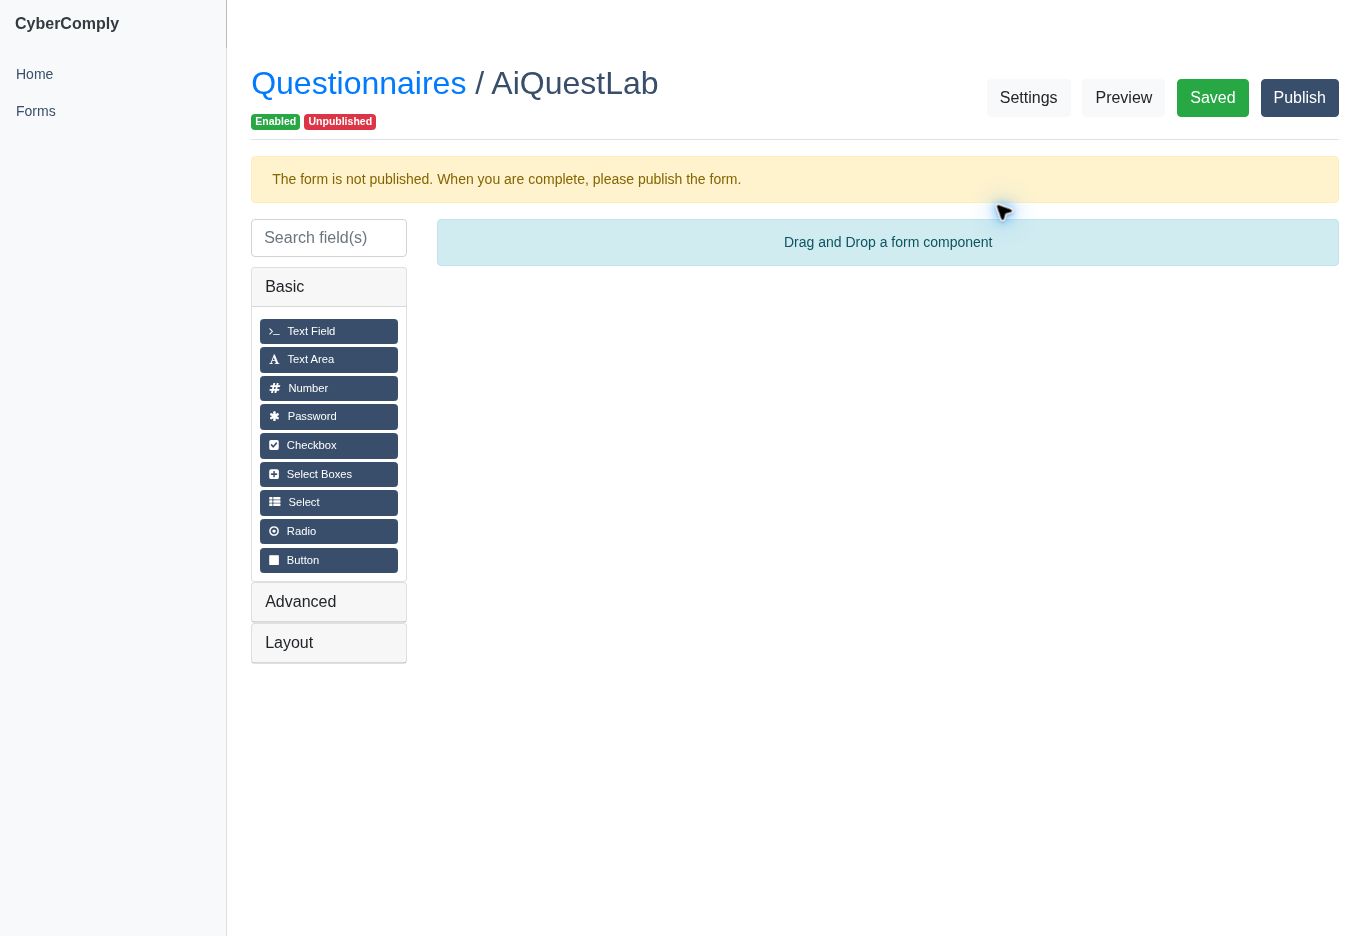
Figure 15. Questionnaire builder with basic, advanced, and layout components.
Create a Questionnaire
1. Open Questionnaire from the left navigation.
2. Select Add Questionnaire.
3. Enter the Name, Description, and Vendor.
4. Set Enabled to True or False.
5. Choose Empty or copy an existing questionnaire template.
6. Save the questionnaire.
Build and Publish the Form
1. Open the questionnaire using View.
2. Drag components into the form area. Basic components include Text Field, Text Area, Number, Password, Checkbox, Select Boxes, Select, Radio, and Button.
3. Use Advanced and Layout groups for additional fields and organization.
4. Configure each component's label, validation, choices, and required state.
5. Select Preview and complete a test response.
6. Confirm the saved indicator is current.
7. Select Publish only after the form is complete and approved.
Password field caution: Do not use questionnaire password fields to collect actual account passwords, OTPs, private keys, or other secrets.
18 Project and Administrative Settings
Settings are divided between the open project, the active tenant, and the overall instance. Access depends on the user's permissions.
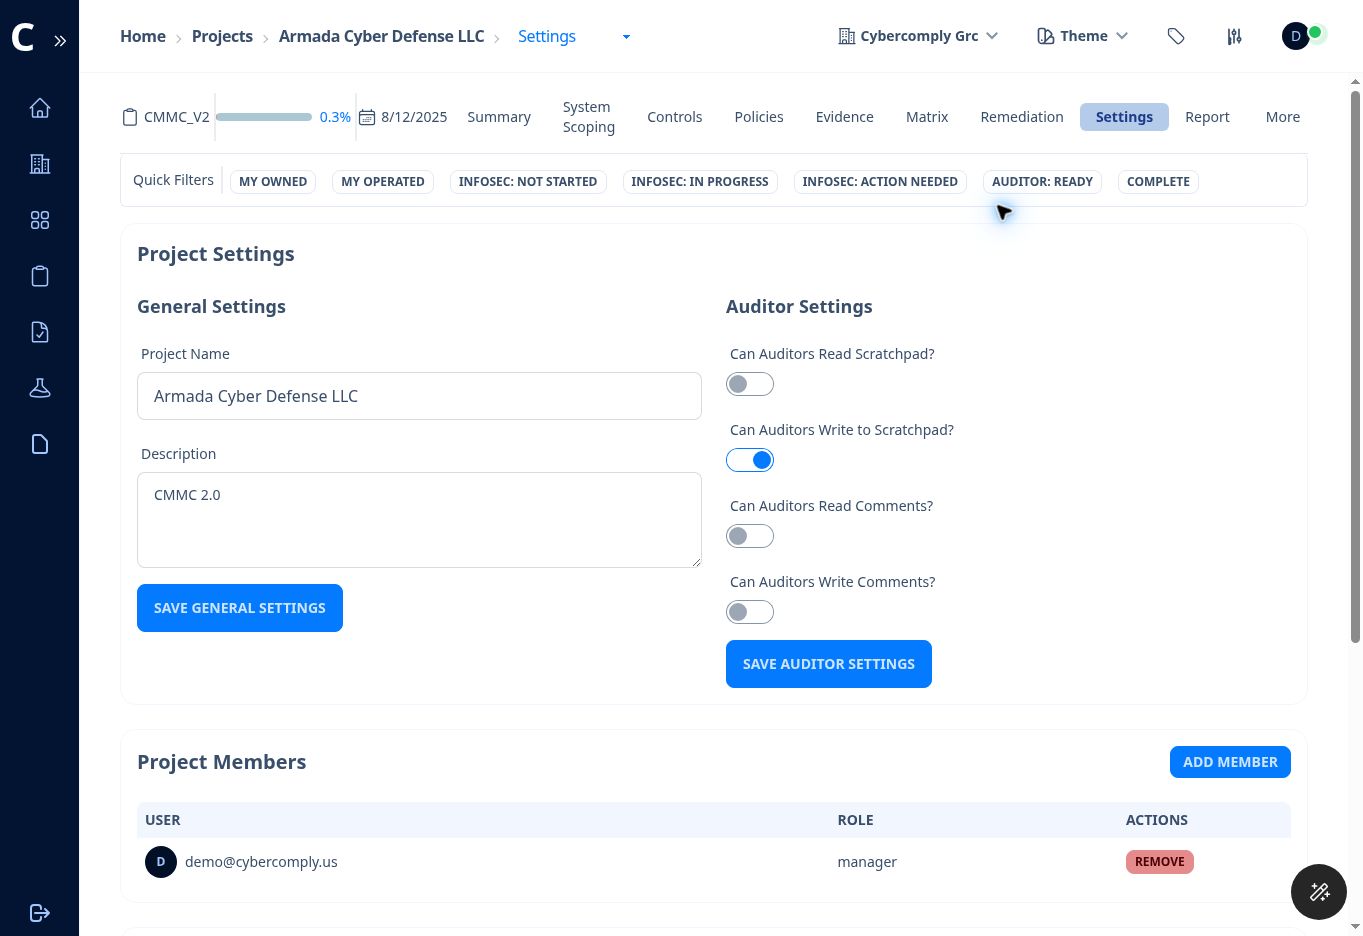
Figure 16. Project Settings with general settings, auditor permissions, and project membership.
Project Settings
| Area | Available Functions |
|---|---|
| General Settings | Edit the Project Name and Description. |
| Auditor Settings | Allow or deny auditor read and write access to the scratchpad and comments. |
| Project Members | Add project members, review roles, and remove members. |
| Project Auditors | Add or remove auditors. |
| Export | Download a project snapshot including controls, subcontrols, and policies. |
Administrative Tools Under More
| Tool | Purpose |
|---|---|
| Frameworks | Lists frameworks and control counts and permits authorized framework management. |
| Tags | Creates logical groupings for controls and policies. |
| Labels | Defines key-value variables used in policies, such as a security contact email. |
| Tenant Users | Manages users and roles within the active tenant. |
| Instance Users | Manages instance-level accounts, tenant creation rights, tenant assignments, active status, super status, and confirmation state. |
| Settings | Maintains the display name, notification contact email, and license field for the tenant or instance configuration shown. |
| Logs | Provides searchable system log entries with message, type, namespace, and timestamp. |
| Help | Opens CyberComply support. |
Least privilege: Only authorized administrators should manage frameworks, instance users, integrations, logs, tenant deletion, or other high-impact settings.
19 Recommended End to End Workflow
The following sequence keeps scoping, implementation, evidence, review, remediation, and reporting aligned.
Phase 1 Prepare the Workspace
1. Create or select the tenant.
2. Add tenant users and verify their roles.
3. Create the project and select the correct framework.
4. Add project members and auditors.
5. Set auditor access to scratchpad and comments according to the engagement plan.
Phase 2 Define the Scope
1. Complete all System Scoping sections.
2. Validate the CUI boundary, data flows, assets, connections, cloud services, and PPS entries.
3. Confirm the target CMMC level and entity identifiers.
4. Approve the scope internally before relying on readiness or SPRS metrics.
Phase 3 Assign and Implement
1. Use the Responsibility Matrix to find missing owners and operators.
2. Assign every applicable assessment objective.
3. Document the actual implementation at the objective level.
4. Set realistic progress and applicability.
5. Associate approved policies with the project and relevant controls.
Phase 4 Collect and Review Evidence
1. Create evidence with meaningful names, types, dates, statuses, and expiration dates.
2. Map evidence to the exact objectives it supports.
3. Review unmapped, expired, rejected, and pending evidence.
4. Use comments for collaboration and feedback for auditor action items.
5. Move objectives to Ready for Auditor only when implementation and evidence are reviewable.
Phase 5 Remediate and Report
1. Record findings and create remediation tasks for unresolved gaps.
2. Assign POCs, risk, effort, resources, and due dates.
3. Validate completed corrective actions.
4. Refresh the SPRS score.
5. Generate and review the SSP and compliance reports.
6. Export the POA&M and project archive as authorized.
20 Common Tasks and Troubleshooting
Use this section as a quick operating reference when a screen, status, assignment, or output does not behave as expected.
Common Tasks
| Goal | Where to Go | Action |
|---|---|---|
| See only my assigned work | Project Summary | Select My Owned or My Operated. |
| Find missing evidence | Project Controls | Set Status to Missing Evidence. |
| Find unassigned work | Controls or Matrix | Filter Owner or Operator to Missing. |
| Attach evidence to an objective | Control Workspace | Open Evidence and select Attach. |
| Create evidence while reviewing a control | Control Workspace | Open Evidence and select Create. |
| Send work to the auditor | Control Workspace | Complete implementation and evidence, then change status to Ready for Auditor. |
| Track a gap | Control Workspace or Remediation | Create a remediation task with owner, risk, effort, resources, and due date. |
| Generate an SSP | Project Report | Choose SSP Report and select Generate New Report. |
| Export POA&M | Project Remediation | Select Export to POA&M (Excel). |
| Back up a project | Project Settings | Select Export Project. |
Troubleshooting
| Problem | Checks and Resolution |
|---|---|
| Wrong projects or no projects | Check the tenant selector. Select the intended tenant and use Reload Now. |
| Progress does not change | Confirm the correct objective was updated, save the implementation, verify progress and status, and reload the page. |
| SPRS score is stale | Save current assessment data, then use Refresh SPRS or Refresh on the Summary page. |
| Evidence shows unmapped | Edit or attach the item to one or more relevant assessment objectives. |
| User cannot access a project | Verify tenant membership, active status, tenant role, project membership, and auditor assignment. |
| Auditor cannot see comments or scratchpad | Review the project Auditor Settings toggles. |
| Report is missing current information | Confirm all changes were saved, then generate a new report version. |
| Word download is unavailable | Some older report versions provide PDF only. Generate a current version and check the available actions. |
| Questionnaire is not available externally | Confirm Enabled is True and the form has been published. |
| Integration does not work | Verify provider authorization, credentials, permissions, network access, and the intended integration type. |
Safe Operating Practices
-
Use least privilege for tenant, project, and integration access.
-
Review the active tenant and project before creating, editing, importing, exporting, or deleting information.
-
Use specific names and dates for evidence and reports.
-
Do not place passwords, OTPs, API keys, private keys, or unrelated sensitive data in notes, evidence, comments, or questionnaires.
-
Preserve version history for SSPs, compliance reports, policies, diagrams, and evidence used for an assessment.
-
Validate exported reports and spreadsheets before providing them outside the organization.
21 Status Reference and Glossary
The following references summarize the principal workflow terms shown in the application.
Control Review Status
| Status | Meaning |
|---|---|
| Not Started | The InfoSec team has not begun objective-level review work. |
| InfoSec Action | The InfoSec team is actively working on the objective. |
| Action Required | The auditor or reviewer requires additional work or clarification from InfoSec. |
| Ready for Auditor | Implementation and evidence are presented for auditor review. |
| Complete | The configured review cycle has been completed. |
Implementation Status
| Status | Meaning |
|---|---|
| Not Implemented | The required capability is not currently operating. |
| Partially Implemented | Some elements operate, but the assessment objective is not fully satisfied. |
| Planned | Implementation is intended but not yet operational. |
| Implemented | The required capability is operating and should be supported by evidence. |
| Not Applicable | The objective does not apply to the approved scope and has a documented basis. |
Glossary
| Term | Definition |
|---|---|
| Assessment Objective | A specific determination statement used to evaluate whether a CMMC practice is satisfied. |
| C3PAO | Certified Third-Party Assessment Organization. |
| CAGE | Commercial and Government Entity code. |
| CMMC | Cybersecurity Maturity Model Certification. |
| CSP | Cloud Service Provider. |
| CUI | Controlled Unclassified Information. |
| Evidence | An artifact that demonstrates implementation or operation of a requirement. |
| FIPS 199 | Federal standard used to categorize the security impact of information and systems. |
| Finding | A documented condition or issue identified during review or assessment activity. |
| InfoSec | The information security team responsible for preparing and maintaining control implementation. |
| POA&M | Plan of Action and Milestones. |
| PPS | Ports, Protocols, and Services. |
| SPRS | Supplier Performance Risk System. |
| SSP | System Security Plan. |
| Tenant | A logically separated company or client workspace in CyberComply. |
| UEI | Unique Entity Identifier used in SAM.gov. |
Final Readiness Checklist
-
The correct tenant and project are selected.
-
System scoping is complete and approved.
-
Every applicable objective has an owner and operator.
-
Implementation narratives describe the real operating environment.
-
Evidence is mapped, current, readable, and sufficient.
-
Comments and auditor feedback are resolved or accurately tracked.
-
Findings and remediation tasks are complete or properly managed.
-
The SPRS score has been recalculated and independently reviewed.
-
The latest SSP, compliance report, POA&M, and project export have been reviewed and stored securely.